
Protect your Azure AKS workloads with DR-as-a-Service (DRaaS) for Azure cloud
Rackware - SWIFT provides simple and robust solution for Disaster recovery of applications running on Microsoft Azure Kubernetes Service (AKS). SWIFT DR policies allow the customers to plan periodic backups as per their needs and thus ensure business continuity. This blog will be a step-by-step guide for how SWIFT can be used for DR purposes for Azure AKS.
STEP 1:
Go to the Azure marketplace DR subscriptions page Azure SWIFT DRaaS offer
You can go through the product overview and Demo video to get a better idea of Rackware – SWIFT.
Click ‘Get it Now’ to explore and start Rackware - SWIFT in your Azure Cloud account.

STEP 2:
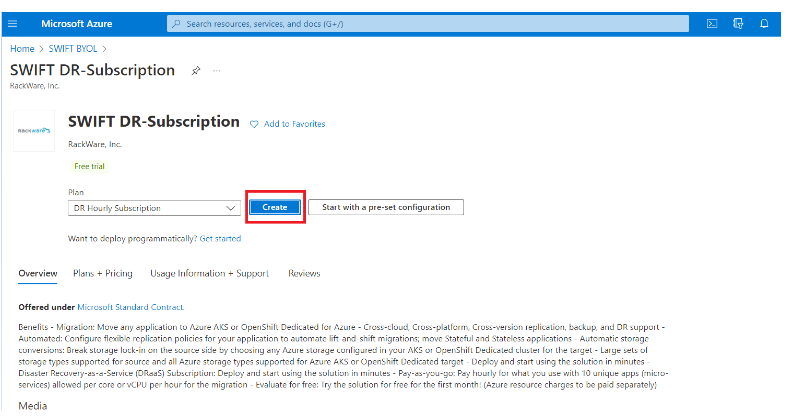
After that, the SWIFT DR-Subscription page will be displayed. Select the DR Hourly Subscription plan and then click on ‘create.’ Optionally you can also select ‘start with a pre-set configuration’ to use pre – existing configurations. With this, free trial automatically starts for the first month in customer's Azure account/subscription.
STEP 3:
After creating SWIFT DR-Subscription plan, SWIFT will be installed. Once you have your SWIFT up and running, access the SWIFT server and set password for admin user
sudo swiftcli user modify admin --password <password>
Now you can access the SWIFT dashboard using the URL - https://<swift-host-ip>/swift/dashboard

STEP 4:
Let’s see how to schedule DR policies to migrate workloads with the example of source GKE cluster to target AKS cluster.
Source GKE cluster:

Target AKS cluster:

SWIFT allows migration of all data and respective applications at namespace scope. So, while applying the policies we need to provide source and target namespaces. If namespace is not provided, ‘default’ namespace will be chosen.
Here you will learn, we are going to migrate namespace ‘demo-test’ on GKE source cluster where I have deployed Wordpress application which has the following content:

SWIFT will sync all or selective objects from this namespace. We can also optionally exclude the PVCs/Volumes attached to the objects for the syncs. The pre-requisite before applying DR policies is we need to configure SWIFT TRAI-pod image and image pull secrets in the source and target namespace.
TRAI stands for Transient RackWare Agent Image. TRAI is an exclusive container image deployed with the SWIFT. During the sync, SWIFT will run TRAI instance as a combination of pod and service under the namespace you are replicating from/to, in order to synchronize data in source and target PVCs.
Configure SWIFT TRAI-pod for SWIFT using the following steps:
Pushing TRAI image to private registry and setting up image pull secret:
The TRAI image is deployed with SWIFT. You can find it on SWIFT server at location
/opt/swift/traipod/rackware-trai-docker.tar.gz
Copy the TRAI image tar file to a host where docker client is installed.
Login to the container registry of your choice. I will be using Docker Hub.
Execute command - docker load < rackware-trai-docker.tar.gz
Run docker images command to verify the image was loaded

Tag the image and then assign it to the registry where you want to push it
docker image tag rackware-trai:<version> myregistry:latest
Eg - docker image tag rackware-trai:kamet-sprint1.0.0.33 girijavk/gktrai:latestPush the image
docker push myregistry:latest
Ed - docker push girijavk/gktrai:latest
2. Setting Image Pull secret on Source and Target namespaces:
To make the TRAI image accessible we need to set up the image pull secret in source and destination namespaces.
Connect to a server where you have working kubectl utility for the required cluster.
Create the secret
kubectl create secret docker-registry <secretname> --namespace=<namespacename> --docker-server=<registry-server-name> --docker-username=<username> --docker-password=<password> --docker-email=<email>
STEP 5:
We need to discover source and target clusters first before starting actual migration. SWIFT Cluster discover collects metadata of source and target clusters which are used for replication purposes. In this demo, we will use source K8S as Google Kubernetes Engine (GKE) cluster and target as AKS cluster.
In SWIFT GUI, Under the ‘Container Clusters’ tab on the right panel, click on the ‘Add’ option to discover source and target clusters, in this case, source as GKE and target as Azure AKS cluster.

Fill up the necessary information and click ‘ADD.’

Added source and target cluster’s info will be displayed on the same page.

STEP 6:
After discovering the cluster, Under the ‘Business Continuity and DR’ tab on the right panel select ‘DR Policies,’ and then click on the ‘New’ option to create new DR policy. This step will create a schedule for DR policies to run, I.e., how frequently syncs should run to take backups.

DR policies can be configured to execute periodically using the following Scheduling parameters:
By – schedule: Setup the execution time of DR policies on weekly/Daily basis using flexible scheduling options.
By – Frequency: DR policies can also be executed frequently one after another after some time.
Once: Schedule the DR policy to occur only once for a given date and time.
Continuous: Continuously execute DR policies one after other back-to-back.
Also do not forget to mention your email for the continuous notifications of DR policy success and failures.

STEP 7:
After creating a new DR policy schedule, we need to apply that schedule. Apply the created DR policy by selecting the DR policy to be applied and then click ‘Apply.

For DR policy Apply, you can select ‘Existing replication’ option where you can pick the replication job which was already executed and convert it into recuring DR policies, so that same job can be executed again with some schedule with the help of DR policies.
Or you can select ‘New replication’ to configure entirely new parameters for DR policy apply.

After applying the DR policies, under ‘Active Replications’ tab, you can see the policies are being executed according to the configured time.

Also, you can pause or un-apply already existing DR policies to stop their execution.

After the sync is completed, you can check the target namespace on AKS replicated from the source namespace:


Also, as mentioned above, we get success/failure messages on mentioned email when the DR policies are completed, a sample email as follows:

Also, SWIFT provides failover and fallback options. The failover operation is the process of switching production to a backup facility (normally your recovery site). A failback operation is the process of returning production to its original location after a disaster or a scheduled maintenance period.
To do failover/fallback, select the DR policy and click on failover/fallback option on the right.
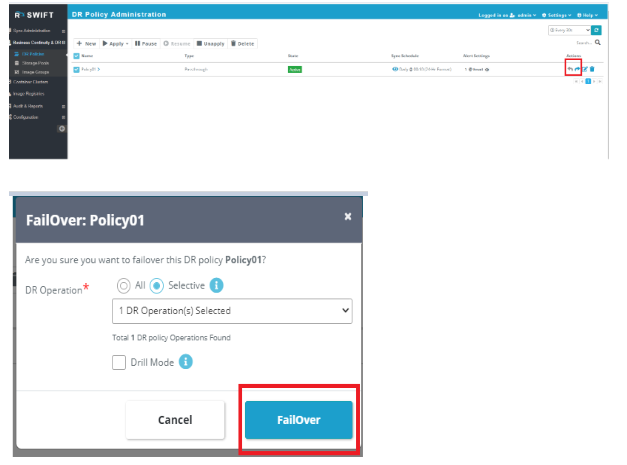
To dry run failover, you can select ‘drill mode.’
Similarly, you can use ‘fallback’ to return them to the production cluster from backup cluster after disaster is over. With these steps your applications on Azure AKS will be periodically backed up at your destination cluster to make them disaster proof.