Quickly make your Azure Container Registry (ACR) and images disaster proof.
Container registries play an important role in deploying containerized applications and maintaining the CI/CD pipeline. Disasters at source site might force us to shift the container registry to the backup site as well. Rackware SWIFT now solves this problem by providing a DR solution to protect your container registry images. It lets you take regular backup of ACR images to other registry options. These options can be:
ACR (Azure container registry)
ECR (AWS Elastic container registry)
Docker Hub
GCR (Google container registry)
OCIR (Oracle cloud infrastructure registry)
In this blog, we are going to see how to use SWIFT to set up a DR registry for your ACR. The source and destination registry are going to be of type ACR.
The blog is divided into two parts.
How to launch SWIFT from Azure marketplace.
How to set up a DR policy for backing up your registry.
Steps to launch SWIFT from Azure marketplace.
1)Search for SWIFT DR in azure marketplace search bar and select SWIFT DR subscription.
2)Launch instance.
You can either create your VM configuration or use a pre-set configuration by clicking on Start with a pre-set configuration option.
Billing will be part of the monthly Azure bill.
Steps to set up a DR policy for backing up your registry.
1) Login to SWIFT dashboard.
-After creating a SWIFT instance, connect to the instance and execute the below command to set a password for the 'admin' user. #sudo swiftcli user modify admin –password <password_of_your_choice>
For more details click here
2) Discover the source and destination registries. Under the Image Registries side tab click on Add.
Provide all the necessary details of the source container registry and the DR container registry.
3) Create DR policy.
Click on DR policies under Business Continuity & DR.
Click New, a form will appear to get policy details.
Fill in the appropriate details.
Select the sync type to be Passthrough.
Select appropriate periodicity options to decide the frequency at which you want your source side repositories to be replicated at the DR-side.
The various periodicity options that you can apply to your DR policy are as follows:
By schedule – Either daily or weekly at some specific time of day. Along with this, you can exclude days that you don’t want replications to run on.
By frequency – This option allows to run replications continuously at a specific frequency of some minutes/hours. Along with this, you can exclude time slots in which you don’t want replications to run on.
Once – This option lets the user to run a replication only once on a decided date and time.
Continuous – Sync jobs will run one after the other.
4) Apply DR policy
There are three methods to apply a DR-policy.
Method 1 is the preferred method as it allows the user to check if the replication task is working correctly.
Method 1: Import Sync Job.
Sync the source and the DR registry.
To sync two registries first click on “All replications” tab under “Sync Administration”. Then click on “New” to select “Registry Replication”.
A window pops up for you to select source and destination registries and other options.
You can either choose to replicate all repositories or selective repositories from the source side to the DR side.
Apply DR policy
select the DR policy, click on the ‘Apply’ button and select ‘Registry Replication’
A form will appear.
Select the start time. The replication can be started immediately or a later time to start can be selected.
Select Existing Replication(s) option.
Select the sync job that was completed in the previous step. You can get information about this job in the All-replications tab
Click on Apply.
(Alternative to ii.)
Go to All replications
Select the replication created in Method1 step1.
Click on apply.
A form will appear, select the created DR policy.
Method 2: Create new replication.
Perform step ii of Method 1.
Instead of selecting existing replication, select new replication.
Give details of the replication. These options are the same as the ones found in step 1 of method 1.
With these steps your Azure Container Registry will be periodically backed up at your destination registry and make it disaster proof.
Source registry
DR registry before sync.
DR registry after sync.
Failover and Fallback.
SWIFT also offers two more features, failover and fallback, to help secure your registry images in case of a disaster. You can access them with these arrows:
Failover: When the failover option is selected a sync operation is performed immediately from source side registry to the DR side registry. After a failover operation is performed, the subsequent scheduling of syncs will be paused.
You may choose which operations you want to apply the failover to – all or only some.
The Drill Mode is only to check if the failover operation would work correctly in the event of a mishap. It will not actually sync any images over to the destination registry.
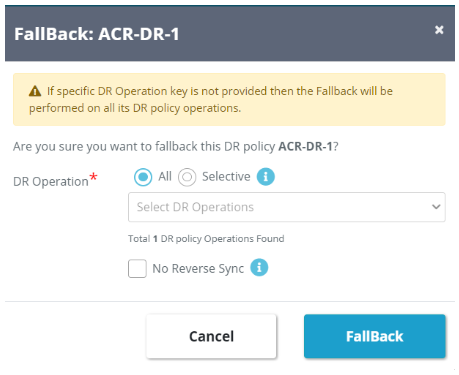
Fallback: In a case when the source registry is down and the user wants to bring it back, a fallback operation can be performed. All the options of a fallback are like those of the failover operation.
Select No reverse sync option if you want to carry out Fallback operation in drill mode.
Note: A Fallback operation can only be performed after a failover operation.


