
Rackware Disaster Recovery
Getting Started for Oracle Marketplace (Paid)
January 2023
Supported Host quantity
Each OCPU this listing is deployed with will allow the RackWare RMM to protect up to 6 source/origin hosts.
OCPUs can be added or subtracted to protect more or fewer hosts (requires reboot).
Example:
12 Source/origin hosts that need to be protected. The paid listing should be deployed with 2 OCPU’s.
21 Source/origin hosts that need to be protected. The paid listing should be deployed with 4 OCPU’s.
Protected hosts OCPU's required
1-6 1
7-12 2
13-18 3
19-24 4
55-60 10
Storage Considerations
Disaster Recovery uses the store and forward method that requires an adequate amount of block storage attached to the RackWare RMM Instance to protect the source/origin workload data. All used data from source hosts is stored compressed in block storage that is attached to the RackWare instance. You will need to add and configure the additional necessary block storage to maintain this.
Since additional storage can be added any time, we recommend starting off with a 1:1 ratio. The data is stored in a compressed method, but additional space requirements are needed for point in time snapshots to be stored using the Disaster Recovery and backup options. Only used data is taken into consideration. Not total size of disks.
Example:
Source/Origin workloads have a total of 900gb USED data (not disk sizes) across all disks then you would provision a 900gb block volume and attach that to the RackWare instance. Additional block volumes can be added at any time if source data is increased or additional point in time backup snapshots are desired.
Cpu/Memory requirements
Every 4 OCPU’s requires at least 24gb Ram
Example:
1-4 OCPU/24gb Ram
5-9 OCPU/48gb Ram
10-13 OCPU/64gb Ram
GETTING STARTED
Deploy and configure the RMM into your compartment
1. Deploy RMM instance from the Marketplace listing.
a. Follow cpu/license chart from above for correct sizing
i. Each OCPU protects 6 hosts
2. Deploy block storage to hold data – see Storage Considerations above for size estimates
a. Within OCI Navigate to Storage > Block Volumes
b. Create a block volume equal to the size required
c. Attach the block volume to the RackWare instance
3. Configure you OCI Security list for access to RMM appliance.
a. Open TCP ports 22, 443 ingress to the RMM
b. Open TCP port 445 ingress from RMM to target subnet
c. From instance view click on the link to the subnet

d. Click the link to the security list for your subnet

e. Add a stateful Ingress rule from the IP or network where you will access the RMM
i. Click on Edit all rules

ii. Add the ingress rules to your RMM from the host you will access it from

4. Configure RMM instance
a. Login through ssh to your RMM Instance
i. Connect with user opc and ssh key supplied when you deployed the instance.
b. Elevate opc user to root
i. All RMM operations must be executed as root.
ii. $sudo su -
c. Create the admin GUI user account
i. # useradd admin
ii. Set the password, use a strong password
iii. #passwd admin
d. Generate new ssh key
i. # ssh-keygen -t rsa
ii. accept defaults and leave passphrase empty
Enter file in which to save the key (/root/.ssh/id_rsa):
Enter passphrase (empty for no passphrase):
Enter same passphrase again:
Your identification has been saved in /root/.ssh/id_rsa.
Your public key has been saved in /root/.ssh/id_rsa.pub.
5. Configure RackWare RMM storage volume
a. List available volumes on the RackWare instance and find the added block volume
i. # fdisk -l
ii. Disk /dev/sdb: 274.9 GB, 274877906944 bytes, 536870912 sectors
b. Add the block volume to the RackWare zfs volume
i. # rwadm zfs configure
Available storages
1. default at localhost:/srv/images
Enter your choice [1]: 1
RMM Storage Pool is already configured
Statistics of RMM Storage pool is :
=====================================================================
| RMM STORAGE POOL |
=====================================================================
Pool Name : rwzpool
Total Size : 5G
Pool Free : 5.00G
ZFS Compression Algorithm: lz4
=====================================================================
Do you want to add extra disk to RMM storage pool? (Y/N) [N]: Y
Existing devices in the system which can be added to RMM Storage Pool are:
Verify your new disk is marked as free
=====================================================================
| EXISTING DEVICES |
=====================================================================
/dev/sda (in-use)
/dev/sda1 (in-use)
/dev/sda2 (in-use)
/dev/sda3 (in-use)
/dev/sda4 (in-use for ZFS)
/dev/sdb (free)
=====================================================================
[A]dd disk or [F]inished [A]: A
You have 3 chance(s) to enter a valid device. Check by executing "parted -l"
Warning: Device will get formatted after adding to RMM Storage pool.
Enter device name/path to be configured as RMM Storage pool. [ONE AT A TIME]: /dev/sdb
Valid device: /dev/sdb
Following disks will be added to RMM Storage Pool:
/dev/sdb
[A]dd disk or [F]inished [A]: F
6. Login to the RackWare RMM GUI
a. Open a Chrome or Firefox browser.
i. https://<rmm_ip>
ii. Username: admin
iii. Password: <this password you created from step 2c

7. Prepare your Linux source hosts
a. TCP port 22 should be open in any firewalls between source and RMM
b. Login to your Source linux host through SSH
c. Create user "rackware" on Source linux hosts
i. # sudo useradd -m -s /bin/bash rackware
d. Login to RMM and copy sudoers file information
i. rmm> #sudo cat /opt/rackware/docs/sudo-config.txt
e. Edit sudoer file on source host
i. source> #sudo visudo
ii. copy sudo-config.txt from RMM to bottom of sudoers file on source hosts
f. Create .ssh directory and authorized_key file for rackware user on source host
i. $ sudo su - rackware
ii. $ mkdir -p /home/rackware/ .ssh
iii. $ touch /home/rackware/.ssh/authorized_keys
iv. $ chmod 700 ~/.ssh/
v. $ chmod 600 ~/.ssh/authorized_keys
g. Copy RMM SSH key to source host
i. FROM RMM
ii. rmm> # sudo cat ~/.ssh/id_rsa.pub
h. Paste ssh key into source host authorized_keys file
i. $ vi /home/rackware/.ssh/authorized_keys
ii. $ sudo restorecon /home/rackware/ -v
i. Test connectivity between your RMM and your linux source host
i. rmm> #sudo ssh rackware@<my_source_ip>
ii. You should connect without any password prompt.
8. Prepare your windows source hosts.
a. TCP port 22 should be open in any firewalls between source and RMM
i. Open TCP 22 on the windows host. Enter netsh command in elevated powershell command (run as administrator).
1. netsh.exe advfirewall firewall add rule name=rw-tcp22-in dir=in action=allow protocol=TCP localport=22

b. Download the Rackware SSH Client installer package to the source host.
i. https://<RMM_IP>/windows/RWSSHDService_x64.msi

c. Run the installer package with administrator level privileges

i. Accept the license agreement and click next

ii. Accept default installation folder and click next

iii. Copy and paste contents of your RMM’s public ssh key
1. RMM > # sudo cat ~/.ssh/id_rsa.pub
2. Copy the ssh key info
3. Leave Username SYSTEM and Password fields blank.
4. Then click next

5. Click Next again

a. Accept UAC

b. Click Close

d. Test connectivity between Rackware RMM and your windows source
i. From RMM
ii. # ssh SYSTEM@<windows_ip>
[root@rackware-rmm ~]# ssh [email protected]
The authenticity of host 'x.x.x.x (x.x.x.x)' can't be established.
RSA key fingerprint is 01:aa:02:bb:03:cc:04:dd:05:00:00:00:00:00:00:00.
Are you sure you want to continue connecting (yes/no)? yes
Warning: Permanently added 'x.x.x.x' (RSA) to the list of known hosts.
[system@rw-win-source ~]
rackware$
9. Configure your Oracle OCI account information.
a. Api url for your region, Examples:
i. https://iaas.us-ashburn-1.oraclecloud.com
ii. https://iaas.us-phoenix-1.oraclecloud.com
b. User ID
i. From your OCI console. Select Identity > Users

ii. Copy the OCID for your user and paste it to a text file for now
c. Private Key File Path
i. Generate an API signing keys
1. Login to your RMM and elevate yourself to root level as described in license instructions earlier
2. #mkdir ~/.oci
3. # cd ~/.oci
4. # openssl genrsa -out ~/.oci/oci_api_key.pem 2048
5. # chmod go-rwx ~/.oci/oci_api_key.pem
6. # openssl rsa -pubout -in ~/.oci/oci_api_key.pem -out ~/.oci/oci_api_key_public.pem
7. Show the key values and copy to clipboard
8. cat ~/.oci/oci_api_key_public.pem
9. reference: https://docs.cloud.oracle.com/iaas/Content/API/Concepts/apisigningkey.htm
10. get path to your key and copy it to notepad
a. # cd ~/.oci
b. # pwd
/root/.oci
c. Your private key path is: /root/.oci/oci_api_key.pem
d. Generate your OCI fingerprint
i. From your OCI console click on your user account as show above
ii. Select the link “Add Public Key”

iii. Copy the contents of the pubic key that was generated in the previous steps into the Add Public key window

iv. Copy your fingerprint to notepad for input later

e. Tenant ID
i. Gather the tenancy id and save for input later

ii. Passphrase: if you created an rsa key with passphrase (not mandatory)
iii. Compartment Name – if other than the root compartment


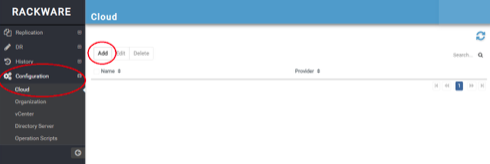
10. Add your OCI account information to the RMM Cloud Configuration
a. Login to your Rackware RMM Console
b. Expand the “Configuration” Tab on the left, select “Cloud” and click on the Add button
c. Change Cloud Provider to OCI

i. Input the information into all the additional fields from the previous section
ii. Name can be any name you wish to give this configuration

iii. Click Add
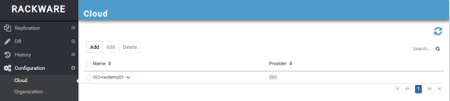

e. Click Apply Changes
The following instructions can be found in the document:
RMM 7.4 Cloud Parameters and Operations v1.15
11. Create Wave files
12. Create and apply Disaster Recovery policies
13. Create Backup policies